Re7 How to Look at Treasure Photo Again
On PC, PS4 & Xbox One: Want awesome items in RE7? You'll find Steroids, Magnum Ammo, and one of the invaluable Repairs Kits at these treasure locations.
Resident Evil 7 isn't all about terror. When the stalkers back off, you're given time to explore the derelict environments around the Baker Farm. During these brief periods of respite, you'll get a chance to go item hunting with three special treasure photos.
These photographs dare you to find the location depicted, and it isn't always obvious where you need to go. To make life easier, check out the complete list of treasure photo locations — where to find the "maps" and where to get the rewards. The prizes are worth your time. You'll get permanent health upgrades, special ammo, and one of the two all-powerful Repair Kits.
Free Items & Upgrades | Treasure Photo Locations Guide
There are three special photos available in Resident Evil 7. Each treasure photo takes you to a rare item. These items will only appear if you've collected and examined the photo — the reward items will not spawn until after you've taken a look at the treasure photo.
Treasure Photo #1:
- Photo Location: Processing Area — On the metal shelves near where you'll find the Scorpion Key.
- Treasure Location: Main House 1F, Drawing Room — Interact with one of the fireplace stones to remove it.
- Reward: Steroids — Permanent character health upgrade.
Treasure Photo #2:
- Photo Location: Old House, Yard — The photo is pinned to covered strairwell on the exterior of the Greenhouse section of the old house. You can first get the photo after following Marguerite through the underground tunnel and climbing out through the well.
- Treasure Location: Yard, Trailer — Look in the toilet bowl of the trailer.
- Reward: x3 44 MAG Ammo
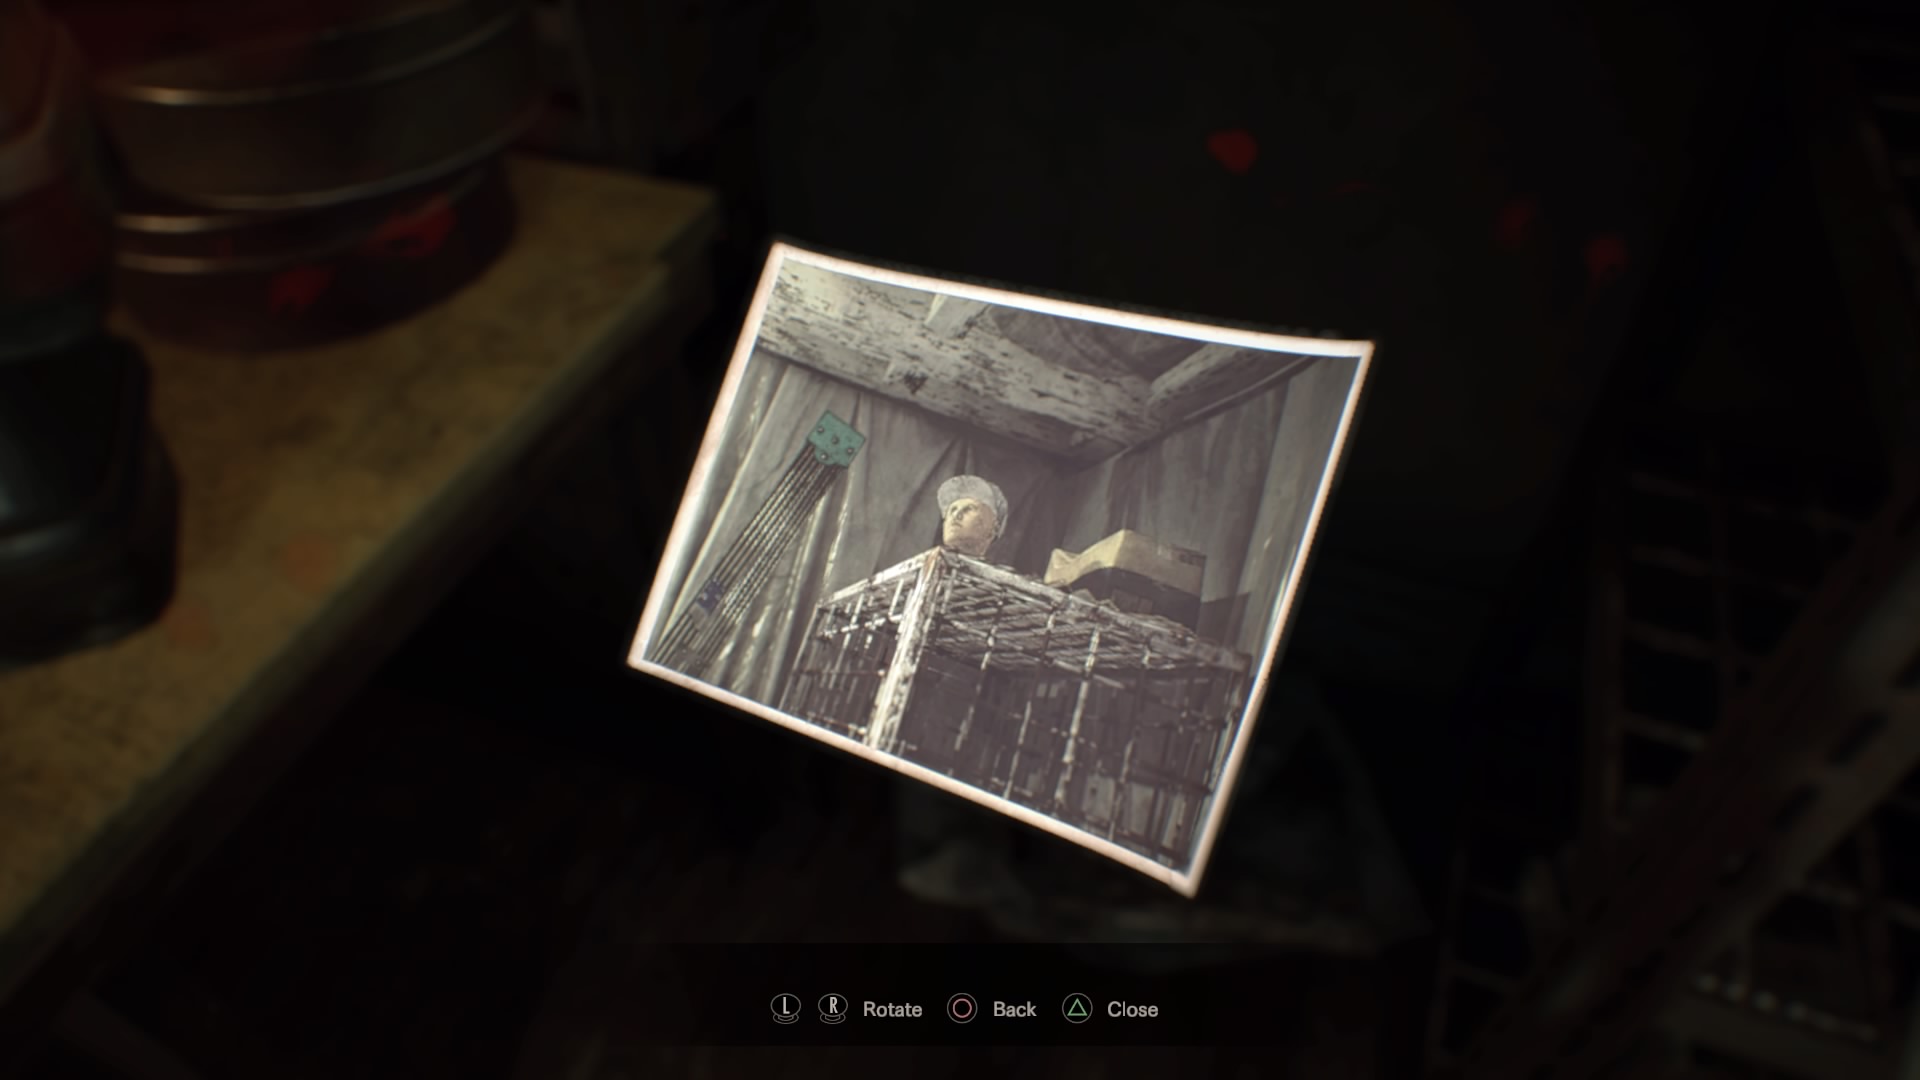
Treasure Photo #3:
- Photo Location: Main House 3F, Supplies — Find the treasure photo in the Supplies closet connected to the Master Bedroom. It's on the red stool to the left as you walk in.
- Treasure Location: Testing Area 2F — Continue to follow the linear path to the third room. There's a cage with a mannequin head in the corner. That's where you'll find the hidden treasure.
- Reward: Repair Kit — Combine with the Broken Shotgun or Broken Pistol to get a new weapon.
More Resident Evil 7 guides, walkthroughs, tips and tricks on Gameranx:
- Resident Evil 7: Biohazard – Walkthrough | Low-Spoilers Guide
- Resident Evil 7: Biohazard – How to Get the Good / Bad Endings
- Resident Evil 7: Biohazard – Here's What You Unlock For Finishing RE7
- Resident Evil 7: Biohazard – How to Open Every Lock | Lock Pick Locations
- Resident Evil 7: Biohazard – All 20 Statue Locations | 'Mr. Nowhere' Guide
- Resident Evil 7: Biohazard – All 32 Files | 'The Devil is in the Details' Guide
- Resident Evil 7: Biohazard – All Antique Coins Locations | Upgrades Guide
- Resident Evil 7: All 33 Antique Coin Locations | Madhouse Difficulty Guide
- Resident Evil 7: How To Upgrade Your Inventory | All Backpack Locations
- Resident Evil 7: How to Repair Both Broken Guns | Best Weapons Guide
- Resident Evil 7: Biohazard – On The Cheap | Best Deals & Lowest Prices
- Resident Evil 7: Demo – Complete Secrets Walkthrough | Dirty Coin Guide
- Resident Evil 7: Biohazard – The Big Gun Guide | All Weapon Locations
- Resident Evil 7: Biohazard – How To Solve Every Puzzle | Solutions Guide
- Resident Evil 7: Biohazard – Herbs Guide | All Healing Item Locations
- Resident Evil 7: Biohazard – How to Beat Every Boss | Tips Guide
- Resident Evil 7: Biohazard – Master of Unlocking Guide | Lock Pick Location
- Resident Evil 7: Biohazard – Trophy List [No Spoilers]
Source: https://gameranx.com/features/id/90134/article/resident-evil-7-free-items-upgrades-treasure-map-locations-guide/
0 Response to "Re7 How to Look at Treasure Photo Again"
Post a Comment